Showing posts with label knitting. Show all posts

Wednesday, February 1, 2017

Knitting Projects: Close to You Shawl and a Lesson Learned


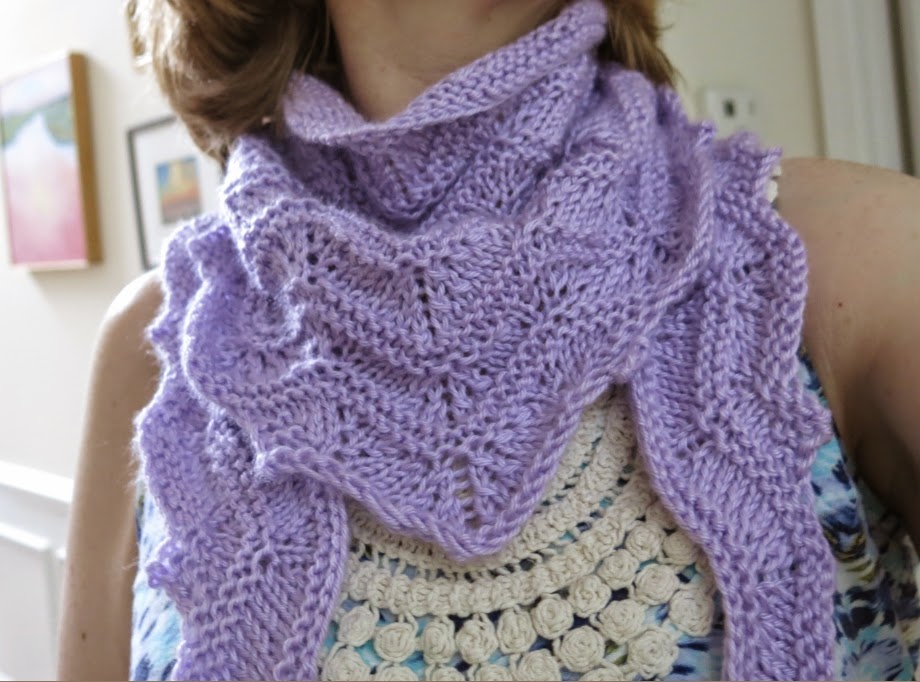
So here I am, showing off my latest knitting project - the Close to You Shawl by Justyna Lorkowska.  This is a free pattern available on Ravelry.  And I love it.  The pattern is rather repetitious, but I love the interesting, yet casual design it creates.  I'm really happy with this project.

This shawl uses fingering weight yarn and as a Christmas present to myself, I splurged on this beautiful purple variegated yarn from Gnarled Paw on Etsy.  This yarn wasn't super expensive, I think it was $18, but more money than I might normally spend.  How much money you spend on yarn is a personal choice, but I'm glad I decided to spend more for this yarn.  The stunning color changes in this skein made it well worth it, IMHO.

I now see the value in investing more money for yarn, occasionally, to create a stand out item that you will enjoy wearing.  Lesson learned.

Thursday, November 17, 2016

Back from a Break with the Rochambeau Cowlette

Rochambeau Cowlette by Carina Spencer

I took a long break from knitting and blogging this summer.  I just wasn't feeling like knitting and couldn't find many patterns that inspired me.  Then summer turned into fall, and fall turned into late fall, and so here we are.

But a few weeks ago, I came across the Rochambeau Cowlette pattern by Carina Spencer.  This is not a free pattern, but I had been looking at lace shawl patterns, thinking about how I rarely knit shawls but wondering whether I would really wear one if I did. 

Enter this beautiful lace cowl pattern.  I love that it's lightweight and features all the pretty detail of a lace pattern, but without all the fussing of wearing a shawl.

I knit mine in Cascade Heritage.  My gauge was off so my cowl came out shorter than the sample, but I like the shorter length on me.  The pattern suggests that you go up 2 to 3 needle sizes for your bind off.  I went up 2, but wonder if I should have gone up another size.  My cowl curls around the edges (as you can see in the photo).  Maybe one more needle size would have combatted this.

Oh well.  I still am happy with my cowl and I think I'll be wearing it a lot this fall and winter.

Wednesday, March 23, 2016

Update 2 and Reveal: Knitted Cable Tee Turned Vest


It seems like forever, but I think its only been a month that I've been knitting and modifying this cable tee by Gayle BunnIn my last update, I said I might turn this tee into a vest.  Well, obviously, I did and I'm very happy with it.  

This change was easy to do, but would have been even easier if I had known from the beginning that is what I would do.  Here are all of my notes, some which I've posted before:

1.  My gauge in this Berroco Vintage was way off so I did my own calculations for my cast on and decreases.  My gauge was 5.5 sts per inch, so I cast on 186 sts to knit this top in the round.

2.  I did 10 sets of decreases (4 decs each time - 2 front side, 2 back side) to bring the chest size down, then did 1 increase round for shaping.

3.  I followed the hem directions and cable chart from the pattern.  I omitted the ribbing on the back since I didn't like how it looked.

4.  Followed the chart directions to row 31 or until my vest was 15 inches long, then bound off for the underarms.  Bound off 4 sts on each side of my markers (left and right) for a total of 8 bound off sts for each underarm.  Then knit the front and back separately.

5.  On the front, I continued to follow the cable chart.  To complete my underarm shaping, I bound off 1 st on each side of my knitting for the next 6 rows (3 bound off sts per each underarm on the front side).  Once my stitches were bound off for the underarms, I continued to knit straight, following the cable chart.

6.  Followed chart through row 56, then bound off center stitches as indicated in pattern.  On the next 12 rows, I bound off 1 st per side of the neck to shape the neckline.  When done, this left me with 16 stitches on each shoulder.

7.  I knit these shoulder straps straight until my armholes were 8 inches deep, then held my stitches and began working on the back.


8.  Working the back, I bound off the underarms in the same pattern as the front - I bound off 1 st on each side of my knitting for the next 6 rows (3 bound off sts per each underarm).

9.  Then I knit straight until my back side was about 1 inch shorter than my front.  Next, I bound off the center stitches, leaving me with 18 stitches per shoulder.

10.  For the next 4 rows, I bound off 1 st per side to shape the back of the neck (2 sts per each side for a total of 4 sts).  This left my with 16 sts on each shoulder.  Then I knit straight for 3 more rows.

11.  I joined the front and back of my shoulders together with a three needle bind off, then blocked my vest.

12.  When dry, I picked up stitches around the neck and armholes and knit 4 rounds, then bound off to create a rolled neckline.  I could have also done a garter st border instead.  Either would have been fine.  I'm happy with the rolled neck.


A couple of last thoughts:

1.  Gayle Bunn's chart for this pattern is real well written and easy to follow.  I expected to find some small mistake in it, but didn't.  It's excellent.  But I would recommend color-coding the cable symbols on the chart to keep them straight.

2.  This top knit in this Berroco Vintage would definitely be too heavy and hot (for me) to wear as a tee.  I'm glad I changed it into a vest.  I think I'll get a lot of wear from it.

3.  If I had known from the beginning that I was going to make this pattern into a vest, I would have made the bottom band wider by knitting more garter rows.  As it is, the hem turns up and I had to iron it to make it lie flat.  Small issue but I thought I'd mention it.

4.  If I were to knit this again, and had the yarn to do it, I'd repeat the cable pattern on the back too.  It's so pretty and would definitely make an eye-catching detail.

Tuesday, March 15, 2016

Two Free Knitting Patterns for Spring: Confetti Fringe Pillow and Cup Cozy


I'm excited to share my latest free knitting patterns, available on my Hubpages!  These colorful accessories, my Confetti Fringe Pillow Cover and Cup Cozy, will add cheer and a bit of fun to any room or occasion. Great for stash-busting, both patterns are included on my Hubpages.


First, the Confetti Fringe Pillow:  This colorful pillow cover features a playful fringe that holds the side seams of this pillow together, resulting in little finishing at the end. Designed for a 16 inch by 16 inch pillow insert, this pattern can be resized easily.  Great for stash-busting!!


And the Confetti Cup Cozy:  This pattern uses the same fringe design, but is a small and quick project.  This cup cozy would make a great gift idea or stocking stuffer at the holidays!

I hope you like these new patterns!  I've had a lot of fun designing and knitting them :)

Friday, March 4, 2016

Update 1: Knitted Cabled Tee Turned Vest


As I mentioned before, I've been in a bit of a knitting doldrums lately.  For a while, I just didn't feel like knitting.  But I rallied myself, and now I'm hard a work on two different knitting projects - which means I haven't made much progress to show on either.

That said, I do have some info and notes to share on my Swingy Knitted Tee.  As you can see from the photo above, I'm a few inches away from splitting the front and back at the armpits.  The cable pattern on this top is even more amazing in person and relatively easy since you only do it once on the front of this top. 

The rest of the pattern has not been so easy for me - all of my own doing and because I'm making a bunch of changes:

1.  I'm knitting this in round to the armpits instead of in parts.  Not a big deal - I really don't know why this pattern wasn't written to be knit in the round.  It's so much quicker.  I'm also deleting the ribbing from the back and just knitting it in straight stockinette.

2.  I'm using a light worsted weight Berroco Vintage yarn (in denim) for this project.  Although it's a light worsted weight, it isn't really dk as the pattern calls for, so my gauge was off enough to cause some calculations.  Sadly, even the small size cast on listed in the pattern was going to be too big with my gauge, so I did my own math based on my body measurements, then added 6 more stitches to the front side as the pattern had for each size.

3.  I doing 10 sets of decreases then 1 increase to shape my top and to match my chest size.

4.  I had originally planned to cast on for a wider looser bottom to create a swingy shape to my top, but it was going to require too many decreases to make the chest fit and I thought it would look weird.  It was also going to require more yarn than I have.

5.  I may still have a yarn storage issue and I've (almost) decided to knit this garment as a sleeveless vest instead of a top.  One - I think to knit the sleeves, I would need another skein of yarn.  And two - this worsted weight yarn is light, but still a little heavy for a short-sleeve top.  I doubt I'd ever wear it as a tee.  I think I will wear it more in colder months as a vest over another another top or blouse.  But... I haven't made up my mind completely.  I will make my final decision when I get to the armpits and see how much yarn I have at that point.

Stay tuned :)

Friday, January 8, 2016

{Free Knitting Pattern}: More Afghan Blocks

from Creativebug.com, designed by Edie Eckman

A couple of days ago, I shared Norah Gaughan's Vintage Afghan, which has recently been released as a free knitting pattern (yea!).  Now I stumbled across another free pattern for blanket blocks, offered in a free course on Creativebug.com and taught by Edie Eckman.

The Edie Eckman afghan pattern seems to be offered as a free trial of Creativebug.com.  According to the comments at the bottom of the Creativebug page, you can download the whole afghan pattern by signing in and clicking on the "materials" link under Week 12. 

Some of the blocks in this pattern are similar to the Norah Gaughan pattern, but others would serve as a nice compliment to Norah's design if you wanted to add additional blocks or substitute some designs.

I'm thinking of making my blanket as a spread for the queen-sized bed in our guest room, and probably increasing it in size by adding blocks.  These blocks from Creativebug.com seem to be roughly the same gauge and might be exactly what I need to enlarge this afghan pattern.

BTW, I just love this afghan in this soft butter/wheat color, don't you?

Wednesday, August 12, 2015

Sweater Project Update 2: Vale Cardigan Back Section & Fronts

from http://www.knitty.com/ISSUEwbis11/PATTvale.php
I've finished the back and front sides of my Vale sweater for the Very Shannon Summer Sweater Knit-Along.  I think I'm right on track to finish this cardigan by the end of the KAL on Sept 8.  I'm excited to have this sweater complete in time for Fall.  I think I'm really going to love it and get a lot of wear out of it.

And because I'm a nice person (sort of), I thought I'd put all my notes for knitting the back and front pieces in one post in case they help someone else :)  So here we go:

the back of my Vale sweater
 THE BACK

1.  As I said in my previous post, this sweater can look a little different depending on the size you make.  The smaller sizes have only three columns of cables across the back, instead of the four shown in the model shot.  I really like the sample sweater, so this was a little disappointing, but I understand that this would change depending on the size of the garment.

2.  Be sure to knit your swatch in moss stitch, not Stst.  I had knit my back piece up pass the underarms when I measured and realized it was going to be a bit small.  When I looked back at the directions, I had realized my swatch was off, which threw off my sizing.

To give myself a little more room in the hips, I cast on again with a #9 needle, and changed to #8 on row 4 of the cable chart.  I knit most of the chart with the size #8, then to tighten up the chest and shoulders, I changed to a #7 about an inch before starting my underarm decreases.

3.   I've lengthened this cardigan a bit too, which I hope I like in the end.  I've added about 1 1/2 inches to the length by starting my underarm shaping at 13 inches instead of at 11 1/2 inches.   

4.  I think the beginning of the charts for both the back and the fronts is a little confusing.  When starting the cable charts (for both the back and front pieces), you need to use Row 1 of the charts TWICE as your set up row (once as the right side, then once as the wrong side).  This will make sense when you knit the pattern.  By using Row 1 twice, it sets you up to do the rest of the charts with the even rows being the right side of your work.

5.  This is a picky thing that might only bother me - but try to pay attention to the cable chart when it comes time to bind off for the shoulder shaping.  I didn't want to end the cable chart and bind off in a weird place where I was halfway through a pointy arrow or something in the design.  I thought this might would look even weirder when I seamed my front and back pieces together.  So when I was a few inches from binding off, I looked at the pattern and chose a point just after doing a cable cross on one of the arrow designs to begin my binding off.  This way, at the shoulders, I'll have two points coming together.

my Vale progress - overlapping the pieces as if they were seamed

THE FRONTS

I followed my notes from above for the front pieces too, so the cable pattern and my decreases would match up.  I only have a few additional notes:

1.   I think there's a mistake on the directions for the decreases on the side seams of the two front pieces.  The directions say you should start the decreases on Row 20 for the back portion.  But the directions for each front piece say you should start the decrease FOR THE SIDE SEAMS on Row 2.  I chose to ignore this and did my side decreases on the same rows as my back decreases so they match up.

2.  Because I lengthen my cardigan by an 1 1/2 inches, I had to adjust where I started shaping the front lapels too.  I honestly don't remember how I figured this out, but I shifted them up about an 1 and 1/2 inches.

3.  This is another weird thing that happens depending on the size you make:  after doing your shoulder shaping for the front pieces, the directions say to "work straight"  to create the neck band.  I think in the larger sizes, this will have you knitting moss stitch for 13 sts and then garter stitch to maintain the neck edging, which is fine and looks good.  However, in my smaller size, this would have me continuing only half of my cable, moss stitch for a few sts, then continuing my garter edge (see the tippy top of my photo above at the shoulder bind off).  This would look very strange as it wraps around the back of my neck.

So for the smaller sizes, this leaves you with two choices:  after finishing your shoulder shaping, you can purl the next 9 sts (which would continue the background of the cable column) then do your few moss sts and then maintain the garter edge.  Or you can switch to moss st for all 13 sts and then do garter st for your edge.  I think either choice is fine.  You just need to decide and stick with it for both front pieces.

I went with switching to moss st for all 13 sts.  After looking at the pattern photos, where they continued the moss st from the front, and other finished projects on Ravelry, this seemed like a good choice.  I thought purl, then moss, then garter might be a bit busy for the neck band when seen from the back.  But honestly, most people would never notice this detail.

And an update on my buttons decision:  After going back and forth on adding buttons to the upper part of the front pieces, I decided against it.  For my size, it just won't work.  To make my decision, I laid out my sweater pieces as if they were seamed (I did this just before I started my underarm decreases on my right piece) to see where I might place my buttons.  As you can see in the photo, I'd have to place my buttons in the middle of my column of cables to have it match up with the right hand edge.  So that's out.  I'm secretly happy.  I didn't really want to figure out how to add buttons in just the right place so that they looked like they belonged there.

So now I begin my sleeves - 3/4 length or long sleeves?  I can't decide.  But I'll let you know :)


Monday, July 27, 2015

{Favorites}: Top Sweater Knitting Patterns for Fall

River Pullover by Cecily Glowik MacDonald

loveknitting just added a fun post to their blog on the Top 5 Sweater Knitting Patterns for Fall!  It's 88 degrees here today, so on the one hand, I kinda enjoy the thought of Fall and cooler temperatures.  However, just looking at long sleeves and thick knits makes me sweat right now.  Ugh.

All that aside, I really do love the patterns they've chosen.  I'm pretty thorough in checking out patterns as they're added to Ravelry everyday.  I must admit, however, some of these skipped my radar and I'm glad to catch them again.  I'm adding them all to my knitting queue now :)

Two of my top favorites:  The River Pullover (above) by Cecily Glowik MacDonald and Peace and Love Sweater (below) by Anna Ravenscroft.  Do you have any favorites?

Peace and Love Sweater by Anna Ravenscroft

Monday, June 29, 2015

Knitty.com ~ That Endless Free Wealth of Knitting Goodness


knitty.com

I try to check out Knitty.com every time a new quarterly issue is posted.  I think the folks there do an excellent job of putting out a great knitting resource full of wonderful free articles, information, and patterns.  But I must admit that most of the time I just give it a quick glance. 

Lately however, searching by way of Ravelry, I've happened upon some marvelous Knitty patterns and have had the chance to revisit some old favorites.  Now my current and upcoming knitting queue is loaded with patterns from Knitty.  Here are some that I've knitted recently or have waiting in my queue:


My version of the Blossoms by the Brook shawl by Ilga Leja.  I've already posted about this project.  I really love it and I am looking forward to wearing it A LOT when the weather is cooler again.

Vale by Norah Gaughan

One of my current knitting projects, Vale by Norah Gaughan.  I love the look of this pattern, and can't believe it's available for FREE on Knitty.com.  I've completed the back section and I am almost done with one side of this cardigan.  Will post an update when I have the side complete.

Fracetured Light Mitts by Kirsten Kapur

Fractured Light Mitts by Kirsten Kapur (also includes a pattern for a matching hat):  I have this pattern in my queue.  I was going to knit these mitts with some stash yarn, but I like the pattern so much that I think I will buy something special to knit them with, then find the perfect buttons to go on them!  You know how much I love vintage buttons :)

Hidden Gusset Mitts by Mone Dräger

The Hidden Gusset Mitts by Mone Dräger:  My friends have made these mitts, and the pattern is just beautiful.  I rarely knit with light fingering weight yarn, but I might just to make these sweet mitts.


Lace Ribbon Scarf by Veronik Avery

And, of course, the Lace Ribbon Scarf by Veronik Avery.  I've posted about this beauty quite recently.  I still love this pattern. 

Wednesday, June 17, 2015

Lace Scarf Patterns: It's Like Déjà vu All Over Again

I know I must have written about searching for lace scarf patterns before.  It seems that every summer I'm looking for a lightweight lace pattern to make a pretty accessory to add to my wardrobe.


Well, this year is like all the others.  I bought this Caron Simply Soft Light (sport weight) in this pretty peacock color to make a scarf to go with my fall jacket.  My new fall jacket is a quilted jacket in olive that I bought on sale for $20.  And I love it.  I wore it all the time last year.  But now I need a scarf to wear with it :)

I think a lightweight scarf will be the perfect solution, and lace scarves are great to knit in summer months - easy to transport and not too hot to handle.  Ravelry is, of course, full of wonderful pattern options.  Here are my top contenders, in no particular order (they're all free patterns):

http://www.ravelry.com/patterns/library/white-diamonds-lace-scarf
First up, the White Diamonds Lace Scarf by Rachel Leverton:  I love the geometric design on this scarf and how the ends have a different structure than the body of the scarf.  I think this scarf could easily be dressed up, or worn more casually.  I'm seriously thinking about this pattern. 

http://www.ravelry.com/patterns/library/bear-claw-scarfette
Next, the Bear Claw Scarflette by Olga Buray-Kefelian:  another beautiful lace design, but might be more dressy than what I'm looking for.  I still love this pattern and might knit it another time, in a different, softer color.

http://www.ravelry.com/patterns/library/rivulet
Then there's Rivulet by Heather Asbeck:  I just found this pattern the other day and I really love it.  It might be just what I'm looking for :)

http://www.ravelry.com/patterns/library/lace-ribbon-scarf
And last but not least, Lace Ribbon Scarf, an old favorite, by Veronik Avery:  I knit this scarf pattern a number of years ago as one of my first lace projects.  I loved how it came out, but I donated it to the Red Scarf Project, along with some other scarves.  I've always loved this pattern, and it might be time to make another one for myself :)  I think it would look great with some long fringe on the ends.

So, those are my choices for now, but I haven't made a decision yet.  Any thoughts?

Thursday, June 4, 2015

{Knitting Book Review} Colorwork Knitting by Sarah E. White

Colorwork Knitting by Sarah E. White

I recently had the wonderful opportunity to review Sarah E. White's latest book "Colorwork Knitting".  If you read this blog, you know I'm a big fan of color and colorwork in knitting, and so I was excited to see Sarah's new book.

Sarah E. White is the author of three knitting books:  "Picture Yourself Felting Your Knitting", "Quick and Easy Baby Knits," and her latest "Colorwork Knitting."  In addition, Sarah is the knitting editor at About.com and CraftGossip.com, both great sites for knitting news and information.

Sarah's latest book is a great source for explanation, instructions, and knitting patterns for a full array of colorwork.  The book includes 25 beautiful patterns that use a wide variety of color knitting techniques.  Colorwork Knitting is broken down into 5 chapters or sections, each covering a different method of knitting in color.  Sarah begins with the easiest: knitting with self-striping yarns, then moves on to more complex techniques like making your own stripes, slip-stitch knitting ( a favorite of mine), stranded knitting, and intarsia knitting.

Slip-Stitch Tweed Top by Sarah E. White
The patterns in this book include designs for sweaters, hats, scarves and cowls, fingerless mitts and mittens, and socks.  Many of these designs would be perfect for a beginner knitter just starting out with colorwork, but would also be great for more experienced knitters.  One of my favorite patterns is Sarah's Slip-Stitch Tweed Top.  I immediately put this in my queue when I saw it on Ravelry.  I love the vintage look of this top (reminds me of something that might be worn in "Call the Midwife") and so easy to change up with different color choices.  I also love the patterns for "Wear Your Heart on Your Socks" and the "Argyle Style Hat."   

One of my favorite things is the pictorial techniques section at the end of this book.  Here, Sarah includes instructions and photos of all the techniques covered in Colorwork Knitting.  These photos are an excellent guide for any knitter.  Often I look at the illustrations or photos that are supposed to help with a certain technique and I can't make heads or tails out of what they're trying to show me.  Sarah's photos are clear and guide you step by step through each process.  I wish I had these photos years ago when I started knitting :)

I can't wait to cast on for some of Sarah's color patterns.  You can find Colorwork Knitting on Amazon.com.  To see the patterns included in Colorwork Knitting, visit Sarah E. White's Ravelry page.  I hope you check it out!

* The opinions shared on this blog are my own and I received no compensation for posting them.

Monday, June 1, 2015

Knitting: Falling out of love, and back in again (Vale Cardigan by Norah Gaughan)

Well, as these things sometimes happen, I've fallen out of love a bit with my striped sweater project.  I'm just not feeling it right now.  I'll probably go back to it, or frog it and make something even better :)

But for now, I've moved on to something I really love:  The Vale Cardigan by Norah Gaughan from Knitty.com.  (Be sure to check Ravelry for some changes to the yarn amounts for this pattern.)

Vale Cardigan by Norah Gaughan from Knitty.com

Quite possibly the most beautiful sweater design there ever was - just gorgeous.  And the best part?  Because this sweater is a shorter length, I don't have to start out with one size for my hips and decrease down to a smaller size for my shoulders!  This rarely happens - Hurray!

I'm so excited about this project, and I'm still knitting it as part of Very Shannon's KAL.  I'm using Berroco Vintage in dungaree for my sweater.  I think it will be a nice neutral color that I'll e able to wear a lot and with everything.

Berroco Vintage in Dungaree

Now I know I said I wouldn't need to do any modifications to the pattern, but I am thinking about making two changes:


1.  I'm thinking of making the sleeves full length by adding an additional cable repeat.  I think long sleeves will be more practical on this worsted weight cardigan.

2.  I'm also considering adding a row of two or three buttons with buttonholes to the upper edge of the lapels of this sweater.  I think it would be a nice design element, and you know I like buttons :)  I also think I'd like the ability to button the top of this sweater in some situations.

I won't get this sweater done in time for the end of the KAL (which ends in a couple of days).  I'm going to take my time with this project and make the right modifications to create a sweater I'll really love.  Stay tuned for updates along the way!


Thursday, May 21, 2015

Striped Sweater Update: Knitting Jogless Stripes


When I started planning my striped sweater pattern, one thing I had to consider is whether to knit it in the round or in pieces.  In the round was going to be easier, and quicker, and with less finishing - but I had to be concerned with the jog or notch at the end of each round that knitting stripes can create.

But if you follow knitting posts on Pinterest at all, you know that there are a ton of tutorials on how to knit jogless stripes.  So I decided to plow ahead and knit my sweater in the round - and went searching for techniques to combat the jogs in my stripes.

I ended up following this tutorial from Knit Purl Hunter on YouTube.


I'm okay with the results, but not completely thrilled.  All of the tutorials are basically the same.  As you start the second round with your new color, you lift up the stitch below and work it with your current color.  Generally, this works great.  But on my thinner stripes, you can see it looks just a little wonky (and even worse when I also do a decrease during this stripe).  Notice my beige or green stripes in the top photo.

Regardless of the wonky-ness, this technique probably looks better than jogs all up one side of my sweater.  And I'm hoping it all looks perfectly fine with a good block after I'm done.  Here's hoping!

Monday, May 18, 2015

KAL & Sweater Update: Striped Sweater Knitting Project


Just when I needed it, Shannon announced her Spring/Summer Tops & Tees Knit-A-Long.  This KAL has given me just the push I needed to finally start my striped sweater project that I talked about here.  I've made good progress so far.  As you can see, I've knitted up past my little pocket that I've pinned closed for now.  The red yarn is holding the stitches for the front of my pocket so I can go back and put a ribbed rim on it.

So here's what I've done and where I'm headed:

1.  I started the front and back as separate pieces from the bottom with k2p2 ribbing.

2.  I made the ribbing on the front about 2 inches deep, and about 2 3/4 inches on the back for a longer tail.  Not sure why, but I want this top to have a (very) slight boxy look and I wanted a longer hem in the back.

3.  Then I switched to my stripes.  After the first stripe, I joined the front and the back and will knit the rest in the round to the armpits.

4.  I've made my stripes wider than I initially planned.  My wide stripe is 9 rounds, and my two thinner stripes are 3 rounds. 

5.  I laid out my color progression before I started, but have been making tweaks as I go.  I will probably have a lot fewer colors left by the time I get past the chest, so the upper part may be a solid color.  And the sleeves may only have a couple of stripes.  I'm okay with this.  We'll just have to see what I have to work with.

6.  Still planning to make this top short-sleeved, but haven't worked out the details yet.  Should be at the armpits by next week and will share what my plan is for the sleeves then. 

Wish me luck!

Friday, May 8, 2015

The Perfect Knitting Project for Travel - And for a Good Cause, Too!

from http://www.wildcarebayarea.org/site/PageServer?pagename=babybirdnest_howcanIhelp

My husband and I have been making some trips to see my in-laws as they have been having some health problems.  And I've been looking for a good knitting project to fill the travel time in the car: a small project, something with a pattern that's easy to memorize, and doesn't take too much attention or concentration.

I happened upon Wildcare's call for knitted nest on the Knitty blog.  Wildcare is looking for knitted and felted nests for raising and feeding orphan birds.  They need nests made in three different sizes, out of either wool, cotton, or acrylic yarn.  The knitting pattern and all the particulars are on their website.


In addition to being a great travel project, I think these bird nests will be a wonderful way to use some of my leftover heavy worsted yarn from previous projects.  A charitable project and a stashbuster - win, win!

If you want more information about the knitted nest project, please visit Wildcare's website.

Wednesday, April 29, 2015

New FREE Knitting Pattern: Mosaic Baby Blanket or Lap Afghan


In celebration of Spring, and just cause I feel like it, I'm now offering my Mosaic Baby Blanket and Lap Afghan knitting patterns for FREE on my Hubpages!  This pattern includes instructions for both a baby blanket and an adult-sized lap afghan.

I think this pattern is so pretty for Spring, and easy to adapt to any room decor or occasion.  I hope you like it :)  Find the pattern here.

Thursday, April 23, 2015

Starting Out: Striped Sweater Knitting Pattern


Probably like a lot of knitters, I have a big pile of random skeins of yarn left over from other knitting projects.  I've decided to pull together my skeins of dk yarn and design a striped sweater to use up some (most? all?) of my leftovers (I have more than what's pictured above).  My plan is:

1.  To design a short-sleeved striped sweater.

2.  I'm going to start the bottom as two pieces (front and back) to create slits on the sides, then join it and knit it in the round to the armpits.

3.  The stripes are going to be varied, as I have different amounts of each color, but I'll follow the pattern of one wider stripe then two thinner ones (6 rounds for the thicker stripe, two rounds for the thinner ones).

4.  I'm going to include a little pocket on the front (I think), because I've never done a pocket before.


5.  I want to incorporate these cute buttons in the sweater,  I plan to use one as a closure on my pocket, and one as a little detail on the collar.

6.  I haven't exactly figured out the sleeves yet, but they'll just be your basic short sleeve with a rib edge.

I hope blogging about this project as I go will make me start this sweater and stop just thinking about it :)  For some reason, I just can't get motivated to start.  Wish me luck!

Sunday, April 12, 2015

Favorites: Blossoms By the Brook Shawl Knitting Pattern

My hubby/photographer is away, so sorry for the crappy photos!
I just had to show off this wonderful shawl pattern I knit from the Spring/Summer 2012 issue of Knitty.  I have kind of a love/hate relationship with shawls.  There are so many AMAZINGLY beautiful shawl patterns out there, but I just don't know how to use them and wear them in my real life.  So I knit very few of them.

But I had a skein of Caron Simply Soft in this beautiful Orchid color that I wanted to make a light and lacy scarf with, so I went on the hunt for a narrow crescent-shaped shawl pattern that I could wear around my neck like a scarf.  I was thrilled to find this Blossoms By the Brook pattern by Ilga Leja on the Knitty site.  What I loved about it was:

1.  It only took about 150 yards of yarn

2.  The pattern was free (let's be honest)

3.  It was easily adjustable

4.  And I just loved, loved, loved the pretty scalloped edge and the wavy ends that this pattern creates.


This pattern is so cleverly designed to grow from the center bottom point, and can easily be knit to be longer and wider.    I wanted a shawl/scarf that was narrow but long, and I made very few modifications.  I found that it helped to put stitch markers between each repeat as my shawl grew in length.  I followed the pattern as written, but only worked Chart B to row 6.  Then I did two rows of purl stitches to create the upper garter border, and bound off with a larger needle.


I did only a light block on this, pinning my shawl down while it was dry and not pulling it too much.  Then I wet it after it was pinned in place.


So happy with the finished shawl!  I love when things come together like this!


Sunday, February 15, 2015

Showing Off & Knitting a Better Thumb: Possessed Printer Fingerless Mitts

Possessed Printer Mitts UNBLOCKED
I just had to share my latest knitting project, the wonderful Possessed Printer Mitts by Emma Galati.  This pattern is great for variegated dk yarn, I used some beautiful merino hand-dyed yarn from Lola-Doodles on etsy.  I bought this yarn a couple of years ago.  I wish I had taken a photo of it still wrapped in its skein.  The color is Mist.  Such a beautiful array on purples, blues, pinks, and greens.  You can see all the amazing colors in the palm of these mitts.


Anyway, love the yarn, love the pattern, but I wanted to add knitted thumbs as other Ravelers had done.  So I followed some of the notes that others had posted and filled in on my own what was missing.  Below are my specific notes on my thumb pattern, based heavily on what AKnitOnTheSide had done.

I didn't want super long mitts, but you can adjust the length by following the pattern for longer before starting your thumb gusset.  I started with my left mitt first:

Left Mitt

I followed the pattern as written for the wrist for 13 caught stitches,  After the 13th caught stitch, I placed a second marker 2 stitches before my end of round marker (to mark my thumb gusset) as AKnitOnTheSide had done.  AT THE SAME TIME as marking my gusset, I knit into the front and back of the two marked stitches, increasing my thumb gusset to 4 stitches.   Then a knit 2 rounds straight, following the pattern.

Note:  While knitting my thumb, I continued to follow the caught stitch pattern on the front of the mitt and knit the palm as directed.

On the third round, when I got to the thumb gusset, I once again knitted into the front and back of the first stitch, knit across the other stitches, and knit into the front and back of the last stitch, increasing my gusset to 6 sts.  I continued this pattern of increasing the gusset every third round until I had 14 stitches in my gusset.  I then knit two more rounds without increasing, but maintaining the pattern.

After these two extra rounds, when I got to my gusset, I moved my thumb stitches on to some waste yarn and cast on 6 stitches using the backwards loop method to create a wall where the thumb was.  Then I knit one round in pattern, knitting all the stitches across the wall .  The next round, I knit in pattern until reaching the wall area, I decreased the first two stitches with a ssk, knit the next two stitches, then decreased the last two stitches with a k2tog, leaving me with 4 stitches in my wall.

Next round, I knit in pattern, and just knit across my wall.  On the fourth round, I continued in pattern until my wall, then ssk, k2tog.  This left me with 2 stitches in my wall and brought me back to the original 40 stitch count.

Now I just finished the pattern as written.  I ended with 30 caught stitches total, then switched to only 5 rounds of the twisted rib for my border.  Then I bound off in pattern.

Finishing up the thumb - I moved my thumb stitches from the waste yarn onto my dpns.  I knit across my 14 stitches, then picked up 1 stitch in the gap between my thumb and the wall, 4 stitches along the base of my wall, and 1 more stitch in the gap between the wall and my thumb (picked up 6 stitches total).  I knit one round, but when I got to my 6 picked up stitches, I decreased the first 2 sts with a k2tog, and the last two stitches, leaving me with 18 stitches around the thumb.  I knit one more round, then switched to 4 rounds of the twisted stitch ribbing before binding off in pattern.

Possessed Printer Mitts UNBLOCKED

Right Mitt

The right mitt follows the same instructions, but use the first two stitches of the 17 knit stitches that make up the palm as the beginning of your thumb gusset.

My mitts are a little bit looser than I'd like, but I hope a good blocking with make them a little tighter.  I hope these notes help anyone who wants to add a thumb to their mitts :)


Thursday, January 22, 2015

Free Knitting Pattern: Slightly Shifting Knitted Cowl


Just posted my latest FREE knitting pattern for my Slightly Shifting Knitted Cowl.  This pattern is a simple, yet beautiful design that looks particularly lovely in a variegated yarn.  I knit my sample up in Cascade Yarn Pacific in color 508 (Hydrangeas).  This yarn is such a beautiful color, like the gentle hue changes in an Impressionist's painting.  Ans this slipped stitch pattern really shows off these pretty colors.

You can find this new pattern on my Hubpages!