Friday, May 8, 2015

The Perfect Knitting Project for Travel - And for a Good Cause, Too!

from http://www.wildcarebayarea.org/site/PageServer?pagename=babybirdnest_howcanIhelp

My husband and I have been making some trips to see my in-laws as they have been having some health problems.  And I've been looking for a good knitting project to fill the travel time in the car: a small project, something with a pattern that's easy to memorize, and doesn't take too much attention or concentration.

I happened upon Wildcare's call for knitted nest on the Knitty blog.  Wildcare is looking for knitted and felted nests for raising and feeding orphan birds.  They need nests made in three different sizes, out of either wool, cotton, or acrylic yarn.  The knitting pattern and all the particulars are on their website.


In addition to being a great travel project, I think these bird nests will be a wonderful way to use some of my leftover heavy worsted yarn from previous projects.  A charitable project and a stashbuster - win, win!

If you want more information about the knitted nest project, please visit Wildcare's website.

Wednesday, April 29, 2015

New FREE Knitting Pattern: Mosaic Baby Blanket or Lap Afghan


In celebration of Spring, and just cause I feel like it, I'm now offering my Mosaic Baby Blanket and Lap Afghan knitting patterns for FREE on my Hubpages!  This pattern includes instructions for both a baby blanket and an adult-sized lap afghan.

I think this pattern is so pretty for Spring, and easy to adapt to any room decor or occasion.  I hope you like it :)  Find the pattern here.

Thursday, April 23, 2015

Starting Out: Striped Sweater Knitting Pattern


Probably like a lot of knitters, I have a big pile of random skeins of yarn left over from other knitting projects.  I've decided to pull together my skeins of dk yarn and design a striped sweater to use up some (most? all?) of my leftovers (I have more than what's pictured above).  My plan is:

1.  To design a short-sleeved striped sweater.

2.  I'm going to start the bottom as two pieces (front and back) to create slits on the sides, then join it and knit it in the round to the armpits.

3.  The stripes are going to be varied, as I have different amounts of each color, but I'll follow the pattern of one wider stripe then two thinner ones (6 rounds for the thicker stripe, two rounds for the thinner ones).

4.  I'm going to include a little pocket on the front (I think), because I've never done a pocket before.


5.  I want to incorporate these cute buttons in the sweater,  I plan to use one as a closure on my pocket, and one as a little detail on the collar.

6.  I haven't exactly figured out the sleeves yet, but they'll just be your basic short sleeve with a rib edge.

I hope blogging about this project as I go will make me start this sweater and stop just thinking about it :)  For some reason, I just can't get motivated to start.  Wish me luck!

Sunday, April 12, 2015

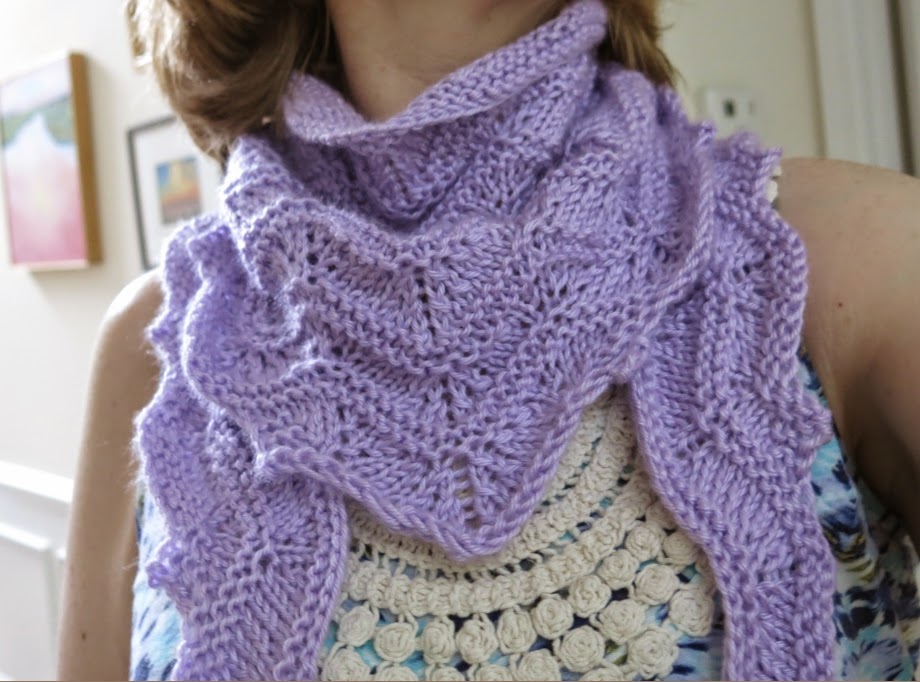
Favorites: Blossoms By the Brook Shawl Knitting Pattern

My hubby/photographer is away, so sorry for the crappy photos!
I just had to show off this wonderful shawl pattern I knit from the Spring/Summer 2012 issue of Knitty.  I have kind of a love/hate relationship with shawls.  There are so many AMAZINGLY beautiful shawl patterns out there, but I just don't know how to use them and wear them in my real life.  So I knit very few of them.

But I had a skein of Caron Simply Soft in this beautiful Orchid color that I wanted to make a light and lacy scarf with, so I went on the hunt for a narrow crescent-shaped shawl pattern that I could wear around my neck like a scarf.  I was thrilled to find this Blossoms By the Brook pattern by Ilga Leja on the Knitty site.  What I loved about it was:

1.  It only took about 150 yards of yarn

2.  The pattern was free (let's be honest)

3.  It was easily adjustable

4.  And I just loved, loved, loved the pretty scalloped edge and the wavy ends that this pattern creates.


This pattern is so cleverly designed to grow from the center bottom point, and can easily be knit to be longer and wider.    I wanted a shawl/scarf that was narrow but long, and I made very few modifications.  I found that it helped to put stitch markers between each repeat as my shawl grew in length.  I followed the pattern as written, but only worked Chart B to row 6.  Then I did two rows of purl stitches to create the upper garter border, and bound off with a larger needle.


I did only a light block on this, pinning my shawl down while it was dry and not pulling it too much.  Then I wet it after it was pinned in place.


So happy with the finished shawl!  I love when things come together like this!


Sunday, February 15, 2015

Showing Off & Knitting a Better Thumb: Possessed Printer Fingerless Mitts

Possessed Printer Mitts UNBLOCKED
I just had to share my latest knitting project, the wonderful Possessed Printer Mitts by Emma Galati.  This pattern is great for variegated dk yarn, I used some beautiful merino hand-dyed yarn from Lola-Doodles on etsy.  I bought this yarn a couple of years ago.  I wish I had taken a photo of it still wrapped in its skein.  The color is Mist.  Such a beautiful array on purples, blues, pinks, and greens.  You can see all the amazing colors in the palm of these mitts.


Anyway, love the yarn, love the pattern, but I wanted to add knitted thumbs as other Ravelers had done.  So I followed some of the notes that others had posted and filled in on my own what was missing.  Below are my specific notes on my thumb pattern, based heavily on what AKnitOnTheSide had done.

I didn't want super long mitts, but you can adjust the length by following the pattern for longer before starting your thumb gusset.  I started with my left mitt first:

Left Mitt

I followed the pattern as written for the wrist for 13 caught stitches,  After the 13th caught stitch, I placed a second marker 2 stitches before my end of round marker (to mark my thumb gusset) as AKnitOnTheSide had done.  AT THE SAME TIME as marking my gusset, I knit into the front and back of the two marked stitches, increasing my thumb gusset to 4 stitches.   Then a knit 2 rounds straight, following the pattern.

Note:  While knitting my thumb, I continued to follow the caught stitch pattern on the front of the mitt and knit the palm as directed.

On the third round, when I got to the thumb gusset, I once again knitted into the front and back of the first stitch, knit across the other stitches, and knit into the front and back of the last stitch, increasing my gusset to 6 sts.  I continued this pattern of increasing the gusset every third round until I had 14 stitches in my gusset.  I then knit two more rounds without increasing, but maintaining the pattern.

After these two extra rounds, when I got to my gusset, I moved my thumb stitches on to some waste yarn and cast on 6 stitches using the backwards loop method to create a wall where the thumb was.  Then I knit one round in pattern, knitting all the stitches across the wall .  The next round, I knit in pattern until reaching the wall area, I decreased the first two stitches with a ssk, knit the next two stitches, then decreased the last two stitches with a k2tog, leaving me with 4 stitches in my wall.

Next round, I knit in pattern, and just knit across my wall.  On the fourth round, I continued in pattern until my wall, then ssk, k2tog.  This left me with 2 stitches in my wall and brought me back to the original 40 stitch count.

Now I just finished the pattern as written.  I ended with 30 caught stitches total, then switched to only 5 rounds of the twisted rib for my border.  Then I bound off in pattern.

Finishing up the thumb - I moved my thumb stitches from the waste yarn onto my dpns.  I knit across my 14 stitches, then picked up 1 stitch in the gap between my thumb and the wall, 4 stitches along the base of my wall, and 1 more stitch in the gap between the wall and my thumb (picked up 6 stitches total).  I knit one round, but when I got to my 6 picked up stitches, I decreased the first 2 sts with a k2tog, and the last two stitches, leaving me with 18 stitches around the thumb.  I knit one more round, then switched to 4 rounds of the twisted stitch ribbing before binding off in pattern.

Possessed Printer Mitts UNBLOCKED

Right Mitt

The right mitt follows the same instructions, but use the first two stitches of the 17 knit stitches that make up the palm as the beginning of your thumb gusset.

My mitts are a little bit looser than I'd like, but I hope a good blocking with make them a little tighter.  I hope these notes help anyone who wants to add a thumb to their mitts :)


Thursday, January 22, 2015

Free Knitting Pattern: Slightly Shifting Knitted Cowl


Just posted my latest FREE knitting pattern for my Slightly Shifting Knitted Cowl.  This pattern is a simple, yet beautiful design that looks particularly lovely in a variegated yarn.  I knit my sample up in Cascade Yarn Pacific in color 508 (Hydrangeas).  This yarn is such a beautiful color, like the gentle hue changes in an Impressionist's painting.  Ans this slipped stitch pattern really shows off these pretty colors.

You can find this new pattern on my Hubpages!

Saturday, January 17, 2015

Latest Knitting Project: Hand-Dyed Chevron Scarf

chevron scarf knitted with hand dyed yarn

Back last summer, I took a yarn dyeing class at my LYS.  You may remember, I contemplated a number of scarf patterns to make with my hand dyed yarn.

My hand dyed yarn
After a few false starts with other patterns, I settled on Cheri Borden's Pearl-barred Scallop Scarf.  All the other patterns I tried caused my VERY variegated yarn to pool and puddle.  So I went back to my old standard: a chevron pattern.  Variegated yarn always seems to look good in a chevron pattern.  And Cherie's knitted scarf pattern had a different purl detail that I think gives my scarf a pretty woven look to it.


Of course, as is my habit, I ended up making some small modifications to the pattern.  My yarn was slightly lighter than what the pattern called for, so I increased the number of stitches and changed the row count a bit.  Since Cheri's pattern is free, I'll share my changes.  Here's what I did:

Co 48 sts using a #5 needle, than began pattern:

Chevron Row 1 (RS):  K3, *yo, k3, cdd, k3, yo, k2,* repeat from * to * twice, then yo, k3, cdd, k3, yo, k3.  (cdd = see original Pearl-barred Scallop Scarf pattern on Ravelry for directions)
Chevron Row 2:  K3, purl to last 3 sts, k3.

Repeat Rows 1 and 2 for a total of 7 times, then do purl detail below:

Purl Detail Row 1 (RS): K3, purl to last 3 sts, k3.
Purl Detail Row 2:  Knit all stitches.

Repeat Chevron Pattern and Purl Detail in order above until you reach desired length.  I knit this pattern until I was almost out of yarn, then bound off as directed.


My finished scarf is quite pretty.  I love the lightness of it.  I'm not sure any of the pictures really show the color changes in the pattern, but I'm very happy with it.  I'd love to try hand dyeing again some time!