Showing posts with label knitty. Show all posts

Monday, July 13, 2015

Sweater Project Update 1: Knitting the Vale Cardigan by Norah Gaughan


So the progress on my Vale Cardigan has been extremely s-l-o-o-o-w.  But that's okay.  I've completed the back and one front side so far.  While knitting this cardigan, I remembered why I try to avoid patterns that have a lot of moss stitch - it's a easy stitch pattern, but requires moving the yarn back and forth with every stitch, which means the project moves rather slowly for me.  But I'm not a fast knitter anyway. 


But I really love the look of this sweater and trust that this slow moving pattern will be worth it in the end :)  So here's what I've learned/realized so far:

from knitty.com

 1.  Just a head's up if you plan to knit this sweater - If you make one of the smaller sizes, the pattern includes only 3 columns of the cabling design, as opposed to the 4 columns shown in the pattern photo on Knitty.com.  This is completely understandable in order to change the size of the sweater, but I am a little disappointed to have less design on the back on my size small sweater (see my photos above).

2.  The gauge listed in the pattern is for MOSS Stitch, not stockinette stitch.  You'll want to avoid making the stupid mistake I did.

from knitty.com

3.  Each front side of this cardigan is almost as wide as the back section of this cardigan.  This is what creates the swing shape of this sweater, but is also going to create two very wide, loose front pieces.  I had thought about adding a few buttons to be able to close this cardigan if I wanted, but now I'm not sure. If I add buttons, I think it's going to look really weird when buttoned, but I'm still thinking about it.

4.  There's a few minor mistakes I've found in the pattern so far:

When starting the cable charts for both the back and front pieces, you need to use Row 1 of the charts TWICE as your set up row (once as the right side, then once as the wrong side).  This will make sense when you knit the pattern.  By using Row 1 twice, it sets you up to do the rest of the charts with the even rows being the right side of your work.

Then I think there's a mistake on the directions for the decreases on the side seams of the two front pieces.  The directions say you should start the decreases on Row 20 for the back portion.  But the directions for each front piece say you should start the decrease FOR THE SIDE SEAMS on Row 2.  I chose to ignore this and did my side decreases on the same rows as my back decreases so they match up.

5.  I've also lengthened this cardigan a bit.  I've added about 1 1/2 inches to the length by starting my underarm shaping at 13 inches instead of at 11 1/2 inches.  I hope this turns out to be a good decision and that I don't run out of yarn because of it.

I'll post more updates as I start the sleeves.


Monday, June 1, 2015

Knitting: Falling out of love, and back in again (Vale Cardigan by Norah Gaughan)

Well, as these things sometimes happen, I've fallen out of love a bit with my striped sweater project.  I'm just not feeling it right now.  I'll probably go back to it, or frog it and make something even better :)

But for now, I've moved on to something I really love:  The Vale Cardigan by Norah Gaughan from Knitty.com.  (Be sure to check Ravelry for some changes to the yarn amounts for this pattern.)

Vale Cardigan by Norah Gaughan from Knitty.com

Quite possibly the most beautiful sweater design there ever was - just gorgeous.  And the best part?  Because this sweater is a shorter length, I don't have to start out with one size for my hips and decrease down to a smaller size for my shoulders!  This rarely happens - Hurray!

I'm so excited about this project, and I'm still knitting it as part of Very Shannon's KAL.  I'm using Berroco Vintage in dungaree for my sweater.  I think it will be a nice neutral color that I'll e able to wear a lot and with everything.

Berroco Vintage in Dungaree

Now I know I said I wouldn't need to do any modifications to the pattern, but I am thinking about making two changes:


1.  I'm thinking of making the sleeves full length by adding an additional cable repeat.  I think long sleeves will be more practical on this worsted weight cardigan.

2.  I'm also considering adding a row of two or three buttons with buttonholes to the upper edge of the lapels of this sweater.  I think it would be a nice design element, and you know I like buttons :)  I also think I'd like the ability to button the top of this sweater in some situations.

I won't get this sweater done in time for the end of the KAL (which ends in a couple of days).  I'm going to take my time with this project and make the right modifications to create a sweater I'll really love.  Stay tuned for updates along the way!


Sunday, April 12, 2015

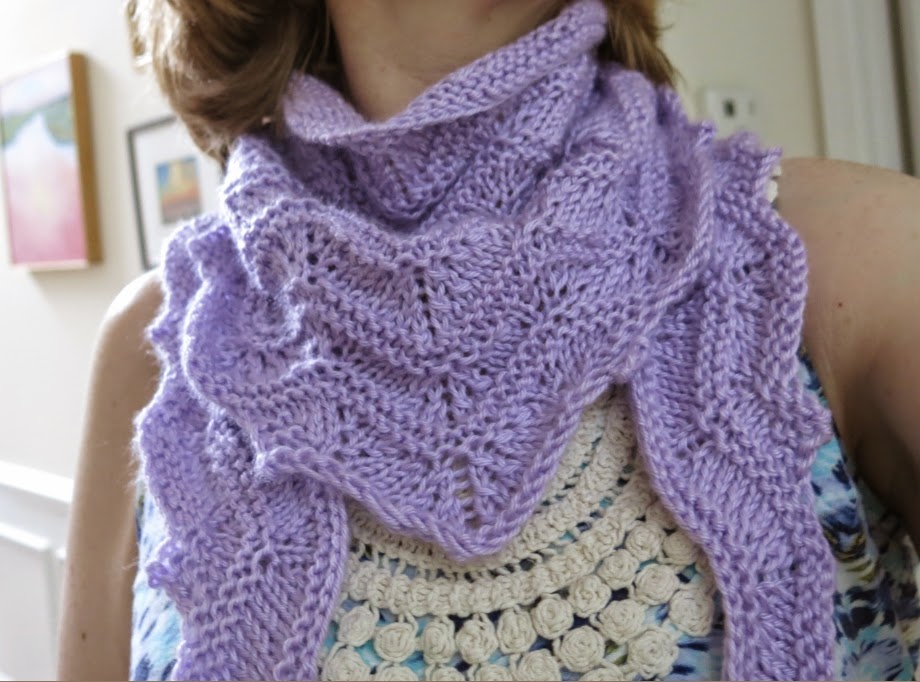
Favorites: Blossoms By the Brook Shawl Knitting Pattern

My hubby/photographer is away, so sorry for the crappy photos!
I just had to show off this wonderful shawl pattern I knit from the Spring/Summer 2012 issue of Knitty.  I have kind of a love/hate relationship with shawls.  There are so many AMAZINGLY beautiful shawl patterns out there, but I just don't know how to use them and wear them in my real life.  So I knit very few of them.

But I had a skein of Caron Simply Soft in this beautiful Orchid color that I wanted to make a light and lacy scarf with, so I went on the hunt for a narrow crescent-shaped shawl pattern that I could wear around my neck like a scarf.  I was thrilled to find this Blossoms By the Brook pattern by Ilga Leja on the Knitty site.  What I loved about it was:

1.  It only took about 150 yards of yarn

2.  The pattern was free (let's be honest)

3.  It was easily adjustable

4.  And I just loved, loved, loved the pretty scalloped edge and the wavy ends that this pattern creates.


This pattern is so cleverly designed to grow from the center bottom point, and can easily be knit to be longer and wider.    I wanted a shawl/scarf that was narrow but long, and I made very few modifications.  I found that it helped to put stitch markers between each repeat as my shawl grew in length.  I followed the pattern as written, but only worked Chart B to row 6.  Then I did two rows of purl stitches to create the upper garter border, and bound off with a larger needle.


I did only a light block on this, pinning my shawl down while it was dry and not pulling it too much.  Then I wet it after it was pinned in place.


So happy with the finished shawl!  I love when things come together like this!